How to run on…
This section describes how to instantiate CernVM appliances on various local hypervisors and clouds.
VirtualBox
CernVM Launch
The recommended way to start a CernVM with VirtualBox is using the CernVM Launch utility.
Manual Instantiation
To configure your VirtualBox for running CernVM do the following steps:
Start VirtualBox
Click the “New” button and a “Create New Virtual Machine” dialogue will appear
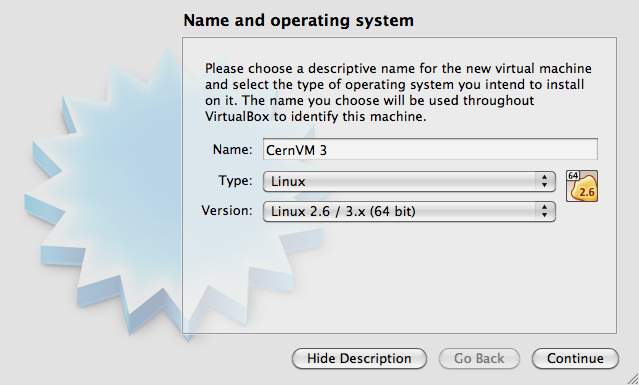
Enter the name of the virtual machine (e.g. “CernVM 4”) and define the OS Type:
As the “Type” chose Linux
As the “Version” chose “Linux 2.6 / 3.x / 4.x (64 bit)”
Click “Continue”
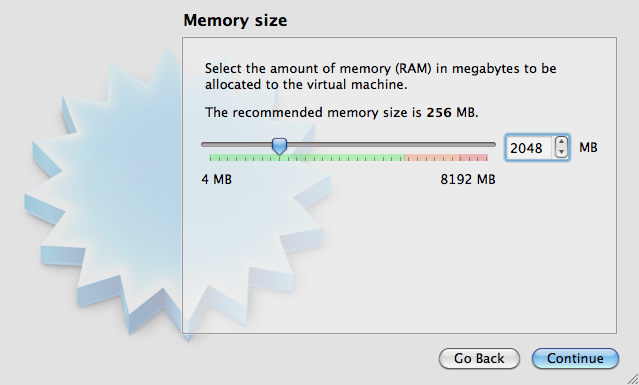
Define the amount of memory which you want to make available to the Virtual Machine (e.g. 2048 MB) and click “”Continue”. Choose at least 1G of memory and leave at least 1G of memory free for your host.
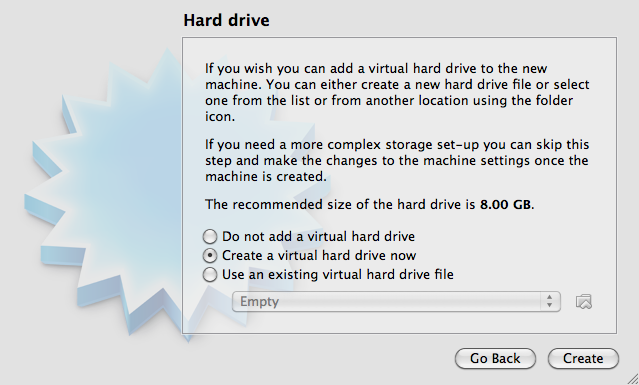
Configure the Virtual Machine hard drive.
Check the “Create a virtual hard drive now” option
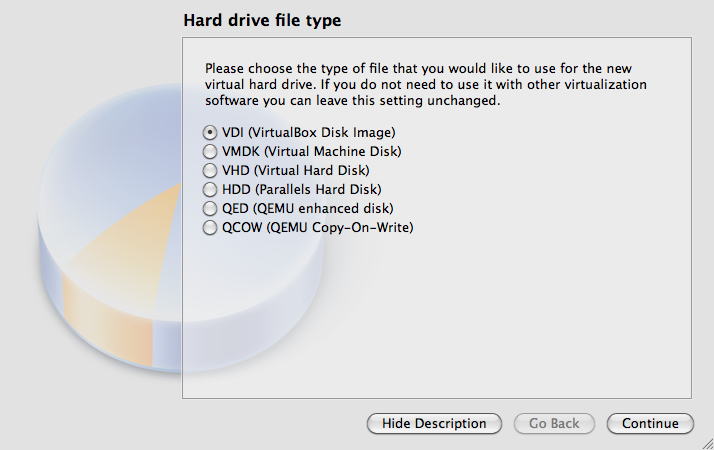
As a hard drive file type, select “VDI (VirtualBox Disk Image)”
For storage on physical hard drive, select “Dynamically allocated”

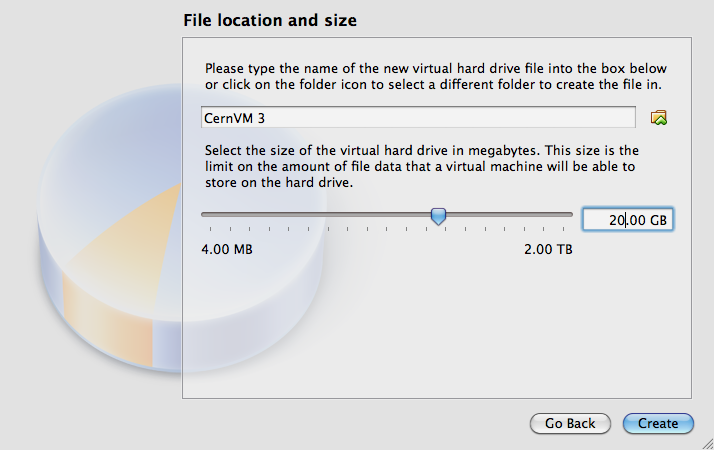
Under file location and size, select the folder and file name of the virtual machine hard disk image and the maximum size. Select at least 20G for the size.
Your new virtual machine will appear in the pane on the left.
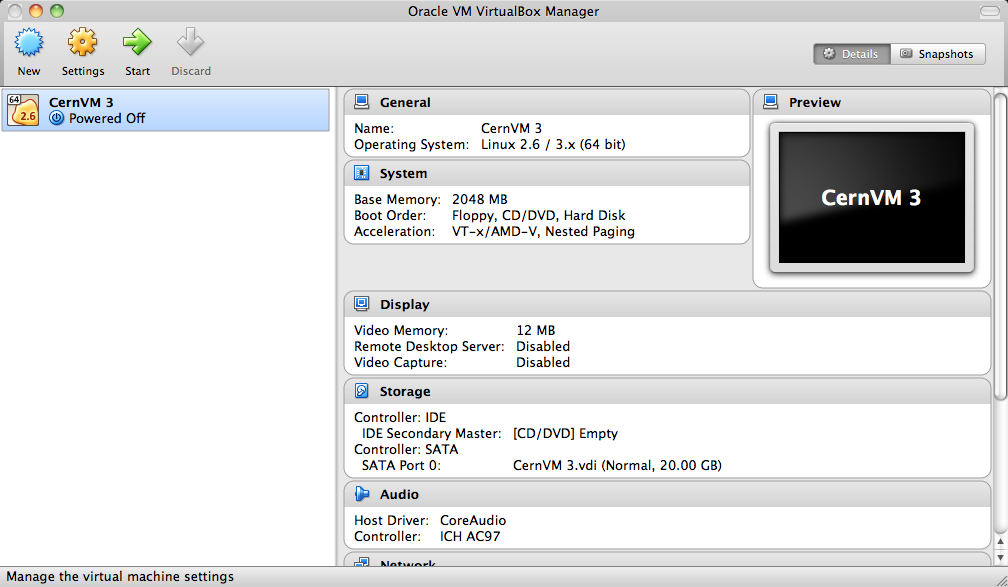
Click on “Settings”
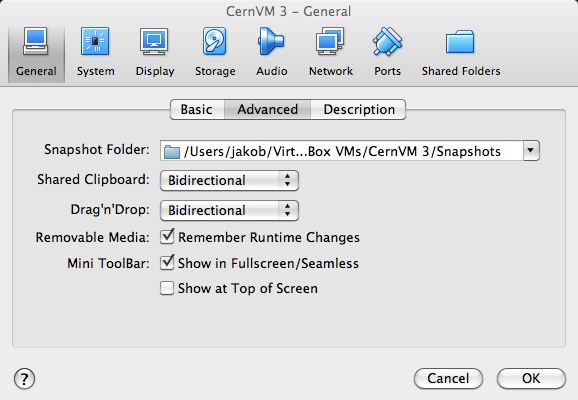
Under “General”, select the “Advanced” tab and choose “Bidirectional” for “Shared Clipboard” and “Drag and Drop”
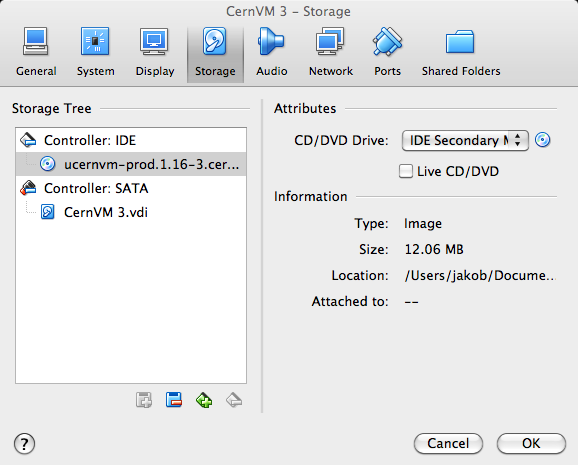
Under “Storage”, click on the empty CD drive entry on the left. Then click on the little CD icon on the top right. Select the CernVM ISO image that you downloaded previously. The CernVM image should appear as CD entry in the left pane.
Under “Network”, click on the “Adapter 2” tab and enable the adapter as a “Host-only Adapter”

Under “Graphics”, select “VBoxSVGA” as a “Graphics Controller”
Close the settings dialog by clicking “OK”.
Now you can Start the virtual machine by double clicking your virtual machine entry in the left pane. Once booted, you need to pair the virtual machine with a context defined in CernVM Online.
Shared Folders
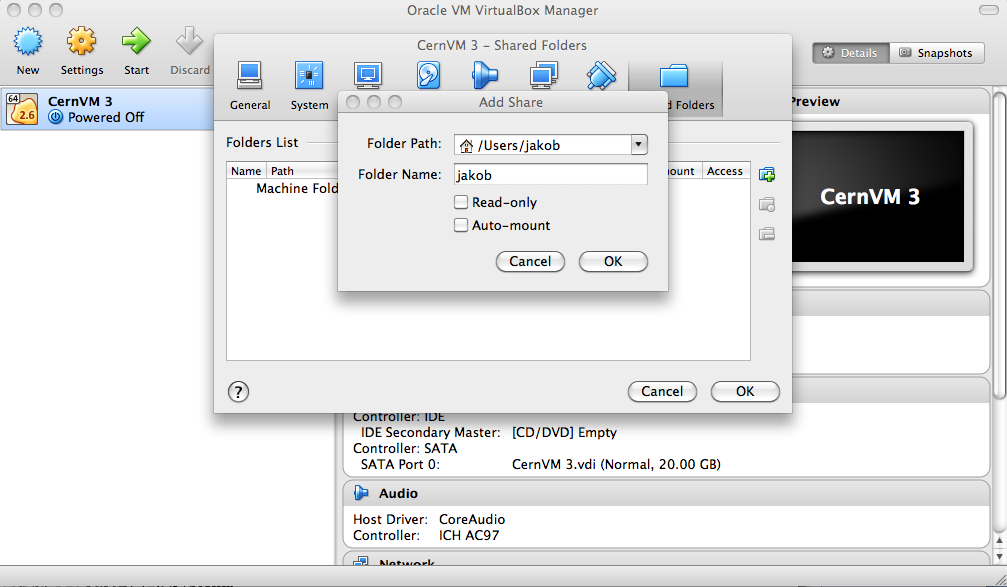
To configure created Virtual Machine, click on “Settings”.
Add the directories under “Shared Folders”. Do not select the “Auto-mount” option. Inside the virtual machine, shared folders are automatically mounted under /mnt/shared.
KVM
CernVM images for KVM (Kernel-based Virtual Machine) are intended to be used by experienced users, or by system administrators. For creating and controlling virtual machines with KVM we recommend using libvirt (in particular virsh command line utility) and virt-manager graphical tool.
Prerequisies
Make sure that your host supports kvm (the output of the command should not be empty)
egrep '(vmx|svm)' --color=always /proc/cpuinfoMake sure that you have kvm, bridge-utils, libvirt, and virt-manager packages installed. The output of the following commands should not be empty.
lsmod | egrep 'kvm(_intel|_amd)'
brctl --version
virsh --version
virt-manager --version # (only for graphical interface)
Make sure that the permissions of /dev/kvm file are set to 0660 (or more open). The file should be owned by “root”, and the group ownership should be set to “kvm”
> ls -al /dev/kvm
crw-rw---- 1 root kvm 10, 232 Oct 19 14:49 /dev/kvm
Make sure that KVM network is properly set up for using NAT
> virsh net-dumpxml default
<network>
  <name>default</name>
  <uuid>a6ae5d2a-8ab5-45a9-94b2-62c29eb9e4f4< /uuid>
  <forward mode='nat'/>
  <bridge name='virbr0' stp='on' forwardDelay='0' />
  <ip address='192.168.122.1' netmask='255.255.255.0'>
    <dhcp>
      <range start='192.168.122.2' end='192.168.122.254' />
    </dhcp>
  </ip>
</network>
Creating a Virtual Machine
Download CernVM ISO image from CernVM Downloads page. CernVM requires an empty hard drive as a persistent CernVM-FS cache. Create a sparse hard disk image file with dd:
dd if=/dev/zero of=cernvm-hd.img bs=1 count=0 seek=20G
Create a virtual machine definition file for virsh (libvirt guest domain management interface), which should contain the following:
- Virtual machine name
- Memory size (in MB)
- Number of virtual CPUs
- Type of architecture (“x86_64”) and boot device (“cdrom”)
- Hard drive and CD-ROM definition
- Network interface definition
- Graphical device definition
Example virtual machine definition file looks like this:
<domain type='kvm'>
  <name>CernVM</name>
  <memory>2097152</memory>
  <vcpu>1</vcpu>
  <os>
    <type arch='x86_64'>hvm</type>
    <boot dev='cdrom' />
  </os>
  <features>
    <acpi />
    <apic />
    <pae />
  </features>
    <devices>
      <disk type='file' device='cdrom'>
        <source file='/data/test/cernvm4-micro-2020.04-1.iso' />
        <target dev="hdc" bus="ide" />
        <readonly />
      </disk>
      <disk type='file' device='disk'>
        <source file='/home/user/cernvm-hd.img' />
        <target dev='vda' bus="virtio" />
      </disk>
      <interface type='network'>
        <source network='default'/>
        <model type='virtio'/>
      </interface>

      <graphics type='vnc' listen='0.0.0.0' port='6019'/>
    </devices>
</domain>
The virtual machine is created with the following command
virsh create vm-definition.xml
Virtual machines can be listed, started, stopped, and removed with:
> virsh list
 Id Name                 State
----------------------------------
 5  CernVM               running

> virsh shutdown CernVM
Domain CernVM is being shutdown

> virsh start CernVM
Domain CernVM started

> virsh destroy CernVM
Domain CernVM destroyed
CernVM as a Docker Container
The CernVM docker container resembles the µCernVM idea in docker. It consists mainly of a busybox and the parrot sandboxing tool. The rest of the operating system is loaded on demand. Note that newer versions of docker prevent the use of the ptrace() call, which is required for parrot. This needs to be explicitly allowed by the --security-opt seccomp:unconfined parameter to docker run ...
Alternatively, it is possible to bind mount the cvmfs operating system repository into the docker container, and then the container will automatically use this instead of parrot.
Limitations of the CernVM Docker Container
The CernVM docker container is a runtime environment only. It can be used to start arbitrary commands “dockerized” in CernVM. Due to its internal mechanis, it cannot be used, however, as a base image to create derived Docker containers, e.g. with a Dockerfile.
Instead you can wrap the setup commands that would be part of the Dockerfile into a script and pass this script as parameter to the /init command line (see below). The script can be bind mounted into the container with the -v option, like
docker run --security-opt seccomp:unconfined -v /path/to/script:/bootstrap ... \
  /init /bootstrap/script.sh
Importing and Running the Container
In order to import the image, ensure that the docker service is running and execute
cat <CernVM Docker tarball> | docker import - my_cernvm
In order to start an interactive shell, run
docker run --security-opt seccomp:unconfined -it my_cernvm /init
The initial command always needs to be /init, but any other command can be appended, for instance
docker run --security-opt seccomp:unconfined -it my_cernvm /init ls -lah
In case CernVM-FS is mounted on the docker host, it is possible to help the container and bind mount the operating system repository like
docker run -v /cvmfs/cernvm-prod.cern.ch:/cvmfs/cernvm-prod.cern.ch ...
In this case, there is no Parrot environment. Every repository that should be available in the docker container needs to be mapped with another -v ... parameter. Note: the cernvm-prod.cern.ch repository (or other OS hosting cvmfs repositores) should be mounted with the CVMFS_CLAIM_OWNERSHIP=no option. You can create a file /etc/cvmfs/config.d/cernvm-prod.cern.ch.local and add the configuration parameter. This will ensure that sudo works in your docker container.
The image can be further contextualized by environment variables. To turn on more verbose output:
docker run --security-opt seccomp:unconfined -e CERNVM_DEBUG=1 -e PARROT_OPTIONS="-d cvmfs" -it ...
To use another operating system provided by CernVM-FS:
docker run --security-opt seccomp:unconfined -e CERNVM_ROOT=/cvmfs/cernvm-sl7.cern.ch/cvm4 -it ...
or
docker run --security-opt seccomp:unconfined -e CERNVM_ROOT=/cvmfs/cernvm-slc5.cern.ch/cvm3 -it ...
or
docker run --security-opt seccomp:unconfined -e CERNVM_ROOT=/cvmfs/cernvm-slc4.cern.ch/cvm3 -it ...
Standard LHC cvmfs repositories are present by default, other repositories can be added with
docker run --security-opt seccomp:unconfined -e PARROT_CVMFS_REPO=" \
  <REPONAME>:url=<STRATUM1-URL>,pubkey=/UCVM/keys/<KEYNAME> \
  <REPONAME>: ..."
The corresponding public key needs to be stored in the container under /UCVM/keys first.
OpenStack
Publicly Available Images at CERN
The CERN OpenStack interface provides publicly available CernVM images for the x86_64 architecture. The CernVM 4 images are CC7 compatible. The image name indicates the “bootloader version”. The bootloader contains the Linux kernel and a CernVM-FS client. The actual operating system is loaded from a CernVM-FS repository.
To start a new CernVM instance,
Log on to lxplus-cloud.cern.ch
Check the available CernVM images from
openstack image listCheck the available virtual machine flavors from
openstack flavor listStart a new instance like
openstack server create --flavor cvm.medium --image "CernVM 4 - Bootloader v2020.04-1 [2020-04-01]" ...Add
--property cern-services=falseto speed up VM creation
CernVM images can be contextualized with cloud-init and amiconfig, general information about the image can be found in the release notes.
Manually Uploading Images (outside CERN)
To be completed.
Amazon EC2
To run instances on Amazon EC2, the CernVM image must be uploaded first to Amazon S3 (“instance storage” instant types) or to Amazon EBS (EBS backed instance types). Note that you need to provision the image in the same Amazon region where you intend to run your instances. Use ec2-describe-regions for a list of available regions.
Preparation
In order to avoid passing credentials and region to each and every command, export the following variables:
export AWS_ACCESS_KEY=<ACCESS KEY>
export AWS_SECRET_KEY=<SECRET KEY>
export EC2_URL=https://ec2.<REGION>.amazonaws.com
If you want to use Amazon’s “enhanced networking” capabilities or if you have a recent account with AWS without support for “EC2 Classic Mode”, you need to first create a virtual network (“Virtual Private Cloud (VPC)”). There are many options to configure such a virtual network. Here, we’ll create a simple private network with a NAT to the Internet. You can also use the Amazon Web Console to create the VPC.
ec2-create-vpc 10.1.0.0/16 --tenancy default
  --> <VPC ID>
ec2-create-subnet -c <VPC ID> -i 10.1.0.0/16
  --> <SUBNET ID>  # needed for ec2-run-instances
ec2-create-route-table <VPC ID>
  --> <ROUTE TABLE ID>
ec2-associate-route-table <ROUTE TABLE ID> -s <SUBNET ID>
ec2-create-internet-gateway
  --> <GATEWAY ID>
ec2-attach-internet-gateway <GATEWAY ID> -c <VPC ID>
ec2-create-route <ROUTE TABLE ID> -r 0.0.0.0/0 -g <GATEWAY ID>
ec2-create-group cernvm-firewall -c <VPC ID> -d "default inbound/outbound port openings"
  --> <SECURITY GROUP ID>  # required for ec2-run-instances
# Unrestricted inbound access:
ec2-authorize <SECURITY GROUP ID> --protocol all --cidr 0.0.0.0/0
# Or: ssh only inbound access:
ec2-authorize <SECURITY GROUP ID> --protocol tcp --port-range 22 --cidr 0.0.0.0/0
ec2-create-keypair key-cernvm-<REGION>  # required for ec2-run-instances
Copy the “BEGIN RSA” / “END RSA” block from the last command into a file key-cernvm-<REGION>.pem and run chmod 0600 key-cernvm-<REGION>.pem. As a further prerequisite, you need to have an S3 storage bucket in your target region, which you can create through the Amazon Web Console.
Using Images from EBS for “EBS Backed” Instance Types
The following steps are necessary to prepare the EBS volume snapshots and the image. First import the CernVM “Raw (HVM)” image for Amazon from the CernVM download page into a minimally sized (1G) EBS volume:
ec2-import-volume -o $AWS_ACCESS_KEY -w $AWS_SECRET_KEY -f raw -s 1 \
  -z <AVAILABILITY ZONE> --bucket <S3 BUCKET> <CERNVM IMAGE>.hvm
The zones for the -z parameter can be listed with ec2-describe-availability-zones. Use ec2-describe-conversion-tasks to get the import task id and to check when the import task finished. Once finished, remove the intermediate image manifest in the S3 bucket with
ec2-delete-disk-image -t <IMPORT TASK ID>
Use ec2-describe-volumes to get the volume id of the imported volume and create a snapshot with
ec2-create-snapshot <IMAGE VOLUME ID>
  --> <IMAGE SNAPSHOT ID>
In addition to the image volume, create a scratch volume (e.g. with 25G) and a scratch snapshot using
ec2-create-volume -s 25 -z <AVAILABILITY ZONE>
  --> <SCRATCH VOLUME ID>
ec2-create-snapshot <SCRATCH VOLUME ID>
  --> <SCRATCH SNAPSHOT ID>
Register an EBS backed image with
ec2-register -n <NAME> -a x86_64 -d <DESCRIPTION> -snapshot <IMAGE SNAPSHOT ID< \
  -b /dev/sdb=<SCRATCH SNAPSHOT ID> --virtualization-type hvm --sriov simple
  --> <AMI ID>
Start instances for the new image with
ec2-run-instances <AMI ID> -n <NUMBER OF INSTANCES> -k key-cernvm-<REGION> \
  -s <SUBNET ID> --group <SECGROUP ID> -t <INSTANCE TYPE> -f <USER DATA FILE> \
  # optionally: --associate-public-ip-address true --ebs-optimized
Using Images from S3 for “Instance Store” Instance Types
Use the following commands to upload an image for use with “Instance Store” image types:
ec2-bundle-image -u <AWS ACCOUNT NUMBER> -c <AWS CERTIFICATE FILE> -k <AWS PRIVATE KEY FILE> \
  -i <CERNVM IMAGE>.hvm --arch x86_64
ec2-upload-bundle -a $AWS_ACCESS_KEY -s $AWS_SECRET_KEY \
  -m /tmp/<CERNVM IMAGE>.hvm.manifest.xml -b <S3 BUCKET> --region <REGION>
ec2-register <S3 BUCKET>/<CERNVM IMAGE>.hvm.manifest.xml -a x86_64 -d <DESCRIPTION> \
  --virtualization-type hvm --sriov simple
  --> <AMI ID>
Start instances for the new image with
ec2-run-instances <AMI ID> -n <NUMBER OF INSTANCES> -k key-cernvm-<REGION> \
  -s <SUBNET ID> --group <SECGROUP ID> -t <INSTANCE TYPE> -f <USER DATA FILE>  \
  # optionally: --associate-public-ip-address true
Enhanced Networking
CernVM contains the default Xen network driver, as well as the “Intel Virtual Function (VF)” adapter and the Amazon “Elastic Network Adapter (ENA)”. With the --sriov simple parameter to the ec2-register command, the Intel VF adapter is automatically used if provided by the instance type. For ENA, the aws command line utility is required (e.g. sudo pip install aws in CernVM). Amazon provides instructions on how to enable the “enaSupport” attribute on an instance.
Whether or not ENA / Intel VF drivers are used can be tested with ethtool -i eth0. If it says “vif” for the driver, it’s the standard Xen driver.
Google Compute Engine
The following steps upload the image and start an instance on GCE:
Login to GCE and switch to a project with
gcloud auth login
gcloud config set project <PROJECT NAME>
If you haven’t already done so, upload the GCE .tar.gz image to Google cloud storage with
gsutil cp <GCE IMAGE> gs://<BUCKET>/<GCE IMAGE>
gcloud compute images create <IMAGE NAME> --source-uri gs:///<BUCKET>/<GCE IMAGE>
If you haven’t already done so, create an ssh key pair to login to the VMs in your project
ssh-keygen -f <KEYPAIR>
gcloud compute project-info add-metadata --metadata "sshKeys=root:$(cat <KEYPAIR>.pub)"
Start an instance with
gcloud compute instances create <INSTANCE NAME> \
  --image <IMAGE NAME> --metadata-from-file user-data=<FILE NAME>
Microsoft Azure
You can use the azure utility in CernVM to upload images to the Azure cloud storage and to control virtual machines.
Setting Azure Credentials
In order to establish your account credentials, use
azure account download
azure account import <CREDENTIALS FILE>
and follow the instructions of the utility.
Uploading the CernVM Image
For Azure, get the CernVM image in VHD format from the download page. If you haven’t done before, create a storage account with
azure storage account create <STORAGE ACCOUNT>
Otherwise, set the storage account with
azure storage account set <STORAGE ACCOUNT>
Retrieve the storage connection string and set it in your environemnt. The <ACCOUNT KEY> refers to the last part of the connection string following AccountKey=.
azure storage account connectionstring show <STORAGE ACCOUNT>
export AZURE_STORAGE_CONNECTION_STRING="<CONNECTION STRING>"
export AZURE_STORAGE_ACCESS_KEY="<ACCESS KEY>"
If you haven’t done so, create a container in your storage account with
azure storage container create <CONTAINER>
Upload and create the image (you can pick <IMAGE NAME>) with
azure vm disk upload <CERNVM IMAGE> \
  https://<STORAGE ACCOUNT>.blob.core.windows.net/<CONTAINER>/<IMAGE NAME>.vhd \
  $AZURE_STORAGE_ACCESS_KEY
azure vm image create --os linux --blob-url \
  https://<STORAGE ACCOUNT>.blob.core.windows.net/<CONTAINER>/<IMAGE NAME>.vhd \
  <IMAGE NAME>
Creating Virtual Machines
For Azure VMs, the ssh credentials are extraced from an X.509 certificate. In order to create valid ssh credentials, use
openssl req -x509 -nodes -days 365 -newkey rsa:2048 -keyout <KEY NAME>.key -out <CERT NAME>.pem
chmod 600 <KEY NAME>.key
You can also create credentials from an existing SSH key with
openssl req -x509 -key ~/.ssh/id_rsa -nodes -days 365 -newkey rsa:2048 -out <CERT NAME>.pem
These procedure is described in more detail in the Azure Online Help.
Virtual machine creation requires a user name and password, even if ssh credentials are provided. We recommend to use azure for <USER NAME> and a throw-away password, for instance "@Aa0$(cat /dev/urandom | tr -cd [:alnum:] | head -c24)". Create the virtual machine with
azure vm create <INSTANCE NAME> <IMAGE NAME> --ssh --ssh-cert <CERT NAME>.pem \
  --custom-data "./user-data" <USER NAME> <PASSWORD>
For ssh login, you can retrieve the public IP address of the image with
azure vm show <INSTANCE NAME>
For help on creating the user-data file, see our contextualization page.